Tuesday 31 May 2011

Southern Bell

Straccetti di Tacchino con Peperoni e Gombo
Turkey Strips with Bell Peppers and Okra 


Ok, I am going to admit to it, straight up... this is the other piece of turkey I had left-over after making my last recipe.
I hope you don't have a problem with that. I certainly don't! 

A lot of people dislike the thought of having the same food two days in a row for some reason. So I want to show you how very different a meal you can make using the very same turkey breast that we made our delicious rolls with the other night... read on!

I slice the turkey breast as thinly as I can, into irregular pieces, or "straccetti". I love the sound of that word (stra-chet-ti), which literally translated means "scraps", "tatters" or "rags". Straccetti is originally a Roman dish made of thin, tatters or slices of beef or veal, which are flash-fried on a hot skillet and served up with a fresh green salad. Very simple and very good. In my version, I am using thinly sliced turkey which I marinate in a mixture of whiskey, Cointreau, mustard, a splash of olive oil and a little orange marmalade. I like to tap the turkey flat using the blunt edge of my kitchen knife rather than pound it flat with a hammer or a pan. I think that poultry tends to lose its texture too much if you pound it too flat and then ends up drying out during cooking. Pop it into the marinade with a couple of slices of garlic and ginger and let it sit for an hour or so. In the meanwhile we can prepare our bell peppers and the okra...

The bell peppers are best prepared in the traditional manner- pop them into a hot oven for ca. 10 minutes and then turn on the broiler to blacken them. Once the skin is scorched, take the peppers and drop them into a bag- paper or plastic, depending on how much you want to save the world.

Actually, I like to save my bags- so I pop mine into a Tupperware container and put the lid on.

It has the same effect of course: the heat can't escape in the closed space and it condenses and liquefies on the surface of the pepper, making the outer skin wilt and loosen from the flesh. After around 10 minutes of cooling, you should be able to peal the skin off easily. Dress with a little olive oil, a pinch of sugar, a pinch of sea salt and a little white pepper. Set to one side and keep warm until we are ready to serve.

Now for the okra- which believe it or not IS called "gombo" in Italian! The first time I ever ate okra, WAS actually in a gumbo, which was a love at first taste affair in Savannah, Georgia... many a moon ago. 

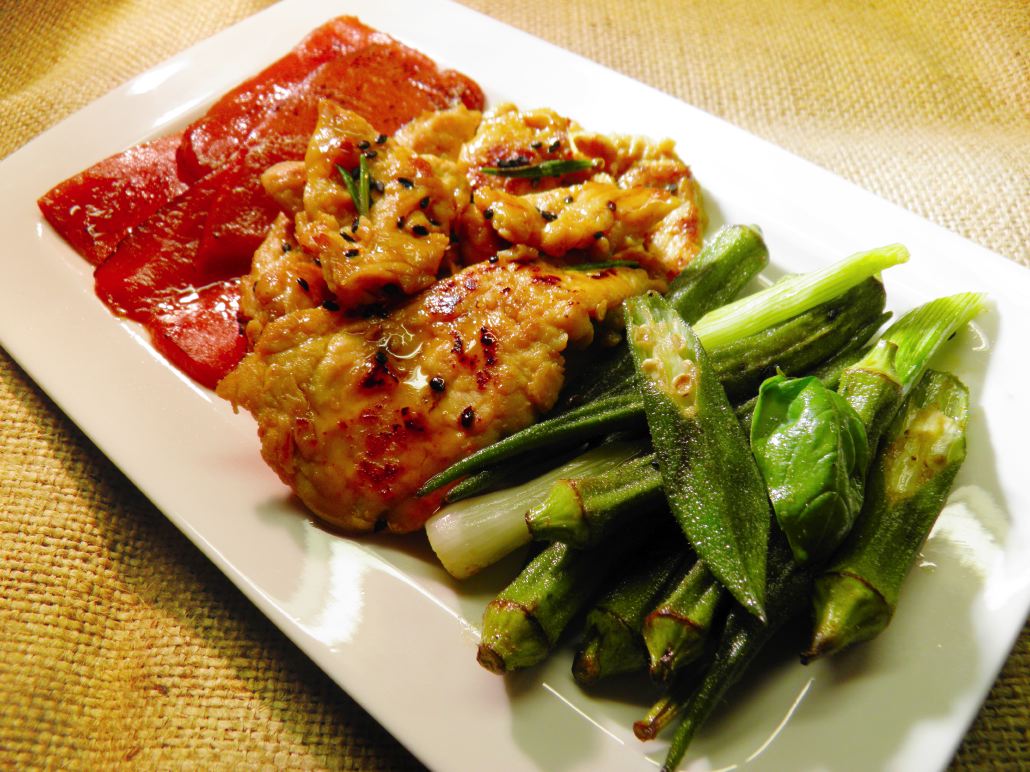
I find that okra, like cilantro, tends to be one of those things that people either love or hate. I find okra to be mild, juicy and delicious, although many people complain of it being "slimy". Well they have simply eaten overcooked okra is all that I can say! In a traditional gumbo, the okra IS supposed to stew for a while- it is the ingredient that makes gumbo thick and creamy and delicious. But in this dish we are just going to pan-fry it in a little butter very quickly. Add a couple of slices of garlic and ginger to add flavor and fragrance, a little salt and a little cayenne... and you should be good to go in anything between 5-10 minutes, depending on the size. The smaller ones do tend to be softer, milder and juicier and I always prefer those to the big ones. Now that the okra and the peppers are ready, all we need to do is to flash-fry out turkey pieces in a very hot non-stick pan. There should be enough oil in the marinade that we don't need any extra. So off we go- once the pan is nice and hot, place your turkey pieces carefully in the pan one by one, making sure that they lay out nice and flat. This will make for a larger surface area to contact the hot pan and therefore a shorter cooking time. The meat should brown quickly due to the sugar in the Cointreau and the marmalade- it should take 5 minutes at the most on each side. Towards the end, add the left over marinade and a few rosemary leaves and you are ready to serve! 

Give the turkey pieces a light coating of honey and sprinkle with toasted black sesame seeds. 

I would serve this with a nice cold Chardonnay and a broad grin on my face... how about you?


Sunday 29 May 2011

Rock 'n' Roll!

Involtino di Tacchino con Spinaci e Funghi
Stuffed Turkey roll with Spinach and Mushroom 


Ah, yes- this one does look a little more impressive now, doesn't it? Can you believe this took all of 30 minutes to make? Well you had better believe it! With only one "special" ingredient, this meal is simple and elegant and inexpensive... three of my favorite things in the world! 

 The "special" ingredient of this dish is a single King Oyster mushroom. This truly is royalty folks! This here fellow is almost the size of my chopping board! They can be a little bit pricey, but I only needed half a mushroom for this serving- so you are not going to ruin yourself be making this! Especially as the only other ingredients are a slice of turkey breast, a strip of bacon, some Dijon mustard, and basil. 

The red wine reduction, infused with star anis, plum preserves and powdered galangal root, is an unctuous and powerful accent to this otherwise Mediterranean meal. A little unusual but complex and different, this is, though very simple to make, the most time-consuming part of the meal... so this is where we will begin!

In a flat pan, bring to the boil some red wine, add a tablespoon of honey, a star anise pod, and a teaspoon of galangal powder. Galangal is a root, similar in look and flavor to ginger, but a little sweeter and milder. Once it has come to the boil, reduce to a low simmer and render it down to a thick, syrupy consistency... it will be black as ink and deeply delicious! Using a flat pan gives you a larger exposed surface area, which will let the wine evaporate more quickly. It's not rocket science! It's easy!

Slice your turkey breast as thinly as you can and spread generously with mustard. Season with salt and pepper and cover completely with basil leaves. Sprinkle very lightly with olive oil and roll tightly. Wrap a strip of bacon around the roll and put it into a dry non-stick pan at a moderate heat. Add a couple of slices of garlic and a little rosemary to infuse the roll with flavor as the bacon begins to release its juices. At the same time it will begin to shrink and tighten around the roll, holding it together. If you are careful, it will work just fine this way- but you can always use a skewer if you feel unsure. Once the bacon begins to brown, add your mushrooms and let them toast in the juices, but don't salt them at the moment as that will make them go tough. Keep flipping the rolls and the mushrooms until ready- this will take between 10-15 minutes.


In the meantime you can prepare your spinach. Chop a little garlic and fry it in a little olive oil. Once slightly brown, add your spinach and sprinkle it with salt, Add a generous grinding of black pepper and a light dusting of grated nutmeg. We all know how quickly spinach is ready... so after 3-4 minutes you should be putting down the cocktail you have been enjoying and reaching for your warm plates to serve dinner! And I am telling you- these little rolls DO rock!


Easy like a Sunday Morning

Pan Roasted Oatmeal with Nuts, Raisins & Fresh Fruit


It's Sunday morning, the sun is shining and everything's good in the world. I have a pound of fresh peaches that I picked up on the farmers market- small ones, the first of the season and deliciously sweet. And I have boring old oatmeal at home too... a few nuts and raisins, but not much else in the way of breakfast. Sigh. Looks like I have my next challenge right there before my very eyes...

Oatmeal is wonderful- versatile, tasty and filling stuff. You can make any number of breakfast dishes or wonderful baked cookies and cakes out of it. it is cheap and healthy and easy... need I say more?

This is what I decided to do this morning... it's not a lot of work, but it is a lot of fun! Make it with your kids and you will find they will enjoy a tasty and healthy breakfast just as much as those sugar and chemical coated supermarket cereals. And probably a whole lot more!

Start off by boiling some milk.  As soon as it has boiled, add your oatmeal and some coconut flakes and stir vigorously- you want to combine everything together into a thick, compact mass. Sprinkle with cinnamon and set to one side to cool and soften.

It's easy so far, right? The good thing is- it doesn't get any more complicated either!

The next step is to melt a teaspoon of butter in your pan- that's all you are going to need to make enough oatmeal to feed the whole family. Once it is melted, add the oatmeal and break it up into little chunks in the pan. Toast it on all sides at a moderate heat. After about 5 minutes add some nuts and raisins- I used almonds in this case, but you can use whichever kind of nut you prefer. Give everything another 2-3 minutes, stirring all the time and then sprinkle with a tablespoon of sugar. This is just enough to caramelize and brown the oatmeal off and to give it a wonderful toffee flavor. But not enough to make everything unhealthy and sickly- sweet. I don't want that and you don't either. And let's face it- nobody NEEDS that. If you make yourselves tasty, healthy food, you will find it easy to shake those bad habits. I did and you can too!

And I am almost sorry to say... that's about all! You are ready to serve and it really hasn't been rocket-science or hard work exactly now, has it? I added a few slices of my wonderful peaches, but you could try strawberries, banana or any number of other fresh fruits. I added a few splinters of pistachio and an extra sprinkle of coconut, along with a light drizzle of honey- and had a real blast for breakfast this morning!

The warm, crunchy oatmeal, the juicy fruit and the cold, fresh milk were just what I needed! After having this for breakfast, a mug of coffee and a glass of juice I feel fit and ready for a great day... Bring it on!

Saturday 28 May 2011

Oh Risotto!

Risotto allo Zafferano con Carciofini 
Saffron Risotto with Baby Artichokes


 Today I finally managed to get to the indoor market for the first time since my vacation... I sure have missed it! Such a wonderful selection of the most amazing ingredients from all four corners of the globe- in such an ugly building! 

Still, Frankfurt's indoor market is second to none and always top of my list when I hit the city streets at the weekend. I picked up a number of lovely fresh fruits and veggies- but it was the baby artichokes that caught my eye first of all! Yum! It was love at first sight and I knew that the two of us would have a dinner date to remember...

This is a really simple dish- but it is elegant and satisfying and has an undeniable element of "wow!" to it. It is also the kind of meal you can half-prepare in advance and have bubbling in the oven whilst you sip on a cocktail with friends and act cool. And let's face it... if you fix them a dinner like this, then you ARE a pretty cool dude (or dude-ette) after all! 

Start off by preparing the artichokes. This is a lot easier than you may think. Trim down the stems and peel away the outer layer. Pull off the larger outer-leaves and trim away the tops of the artichokes generously as they are always woody and much too tough to eat.

Cut the artichokes in half and you will see the "choke" at the center. This can easily be removed by cutting a "v" shaped chunk out of the middle. Now dip the cut surface of the artichokes into some lemon juice to stop them oxidizing and going brown. Prepare a simple vegetable stock and boil the artichokes in it for 20 minutes. The artichokes will be tender and succulent by then and will have given a wonderful flavor to the stock. For the risotto itself, you will need to make a classic "sofritto" of onion, celery and carrot. Finely chop these and fry together with a little finely chopped bacon in a saucepan. Now add the Arborio rice and make sure it also gets coated in the fat from the bacon. A good splash of white wine will help free all of the good flavors that will have accumulated at the bottom of your saucepan- and a nice splash for yourself will help free your cooking inhibitions and let you enjoy yourself more- so this is a good point to pour yourself a nice cold glass! 
Now add a little sliced garlic and a good pinch of saffron. I don't like to fry the garlic in this case, as I feel it tastes sweeter and milder if it gently boils along with the rice. Season with salt, pepper, a few chili flakes and proceed to cook in the accustomed manner, adding the stock ladle-by-ladle and stirring until it is absorbed my the rice and so on...

After around 15 minutes you can add a last, good ladle full of stock and turn off the heat. Add a good pat of butter and a little grated parmesan, a good pinch of chopped parsley, and pour into an oven-proof dish. We are going to finish this off in the oven, so that the artichokes come back up to temperature... and also, so that the final ingredient has a chance to cook and give our dish the bit of muscle it needs to make it really good. Some good-old crispy bacon!

Arrange your artichoke halves on top of the rice and add a few pieces of bacon randomly- don't get carried away and overdo it- just enough to look decorative. Cover with foil and finish the cooking time at a moderate heat- another 20 minutes or so should be enough- you will have to try it out and see how it is going. If necessary, you can always carefully add a little stock if it is looking dry.  When the rice is cooked, remove the foil and give that bacon a quick blast from the broiler to crisp it up. The juices from the bacon will give the risotto a gently smokey flavor and the added crunch will give a great contrast in texture.

I like to serve mine with grated, salted ricotta cheese, but you can use any seasoned cheese that you like. Give it a good grinding of chili flakes and you are ready for dinner! Although there is a white wine used in making this dish and although it is so light and harmless looking- it does pack quite a punch in the flavor department, which is why I had a nice glass of Corvo with mine. A nice full- bodied Sicilian... just like me!


Friday 27 May 2011

Rosemary's Baby

Rosemary/Mint Yogurt Mousse 
with Blood Orange /Grenadine Topping and Red Peppercorns


As you well know, classic desserts are not my forté.
Baking is generally speaking too complicated for me... and I don't own an ice cream maker. Yet.
That is something I really need to do sometime soon!
But for tonight, I want you to "get your freak on" with me and open your mind to this little beauty.

This flavor combination is out of this world...
 So prepare to discover taste buds you didn't even know existed!

There really is no need for desserts to be too rich or too sweet. I used a low-fat yogurt to make this and it tasted just fine. To flavor the yogurt, you will need about 1 teaspoon of finely chopped rosemary per portion. Pop this into a small saucepan with a little water, a teaspoonful of sugar and 2 tablespoons of Creme de Menthe per portion. I popped a vanilla pod into the mix for a few minutes to give a little extra body and smoothness to the flavor.

I do this often- you can always rinse the pod off again and save it for future use. People love to cut the pod and scrape out the seed- but personally I think the pod itself has more aroma to it. This is not just me being cheap!

Add 1 - 1 1/2 tablespoons of granulated gelatin and stir in with a whisk. Remove from the heat and allow to cool for a while before adding it to your yogurt. Mix this in well, pour into individual forms and refrigerate for at least 4-5 hours.

For the topping, chop blood orange segments up finely and render them down in a mixture of Cointreau and grenadine. This will take between 10-15 minutes of simmering to become nice and syrupy. At this point, add the red peppercorns and allow to cool.


A nice extra touch is a sprinkle of coconut, which give you something neutral tasting to balance out these two extreme flavors and textures and the fiery pepper! And if that isn't enough of a firework-show of flavor to finish off a great meal- then I don't know what is!

Pasta e Basta!

Bavette con Salsiccia, Olive Nere + Cavoletti di Bruxelles
Pasta with chopped sausage, black olives and brussels sprouts


It's Friday night, I am home late from work and tired-out from a stressful week. Sure, I am looking forward to the weekend and all... but I just need something quick and easy to eat, something satisfying and comforting. I need a night-in and a rest! As usual, my fridge is running low at the end of the week, as Saturday is that day that I raid the indoor market in Frankfurt. So it is time to improvise again. Luckily I have a chunk of Italian sausage, a few olives, a bit of salted ricotta cheese and a handful of Brussels sprouts there. Just what I need to make a yummy, "emergency" pasta supper! Nothing hits the spot like a hot bowl of pasta!

I start out by chopping the sausage into very small pieces and frying it in a dry pan. As soon as it starts to give off its juices, I add a chopped clove of garlic, a chopped spring onion and a good pinch of cumin seeds. This combination, along with the sweet Brussels sprouts and the salty Ricotta and olives is a truly delicious mix. Season with
plenty of black pepper and set to one side.

Boil the pasta in the classic way in plenty of salt water. The way to get your pasta to taste good is to not skimp on the salt whilst boiling it. The water should be as salty as sea water. You will have a hard job making your pasta too salty at this point... but you will have an even harder job to season the finished dish nicely afterwards if you don't. The pasta will only absorb so much salt anyway and the rest gets poured off when you drain it.

So just do as your told! Plenty of salt in the water- not so much in the other ingredients!

Cut your sprouts in half and drop them into the pasta water after around 5 minutes. They will only need 4-5 minutes to cook themselves. This makes it easier to time everything and save you unnecessary washing-up! Drain the pasta after 8-9 minutes... it should still have plenty of bite and need to cook for a little while longer. Now add a good splash of milk and grate generously with nutmeg. Carry on cooking for a further 2-3 minutes till the milk is absorbed... you will find the pasta becomes creamy and has a delicious "Bechamel-like" flavor. Add a drizzle of olive oil and you are ready to serve.

The finishing touch is a nice grating of salted Ricotta. Which is why I don't want you to season the sausage and olive mix- there is enough seasoning in this combination of ingredients that you don't need the added salt. A final grinding of black pepper and one last drizzle of olive oil... and you can kick-back and let the weekend begin!

Buon appetito!


Wednesday 25 May 2011

Indian Summer

Pork and Veal Burger with Red Lentils and a Lemon-Curry Sauce


Ok- so you reckon a burger, is a burger, is a burger, right? 
Wrong! 
Think again and open your mind to something a little different. 
I guarantee this Summery, spicy little devil will tantalize your taste-buds and satisfy your culinary curiosity in one fell swoop. Put away those awful, soggy white bread rolls and tuck-in to a simple but sophisticated taste of luxury...

Let's start with the lentils, as they are going to need to cool to make your salad. Red lentils have a much shorter cooking time than the ordinary brown ones. If you overdo them, you will find you have a saucepan full of lentil-skins and a pale orange mush. So don't! This is my easy way of doing it.

Chop a little garlic, celery and onion very finely and brown them in a saucepan with a pat of butter and a sprinkle of cumin seeds. Add the lentils and stir. Season with salt, pepper and some chili flakes and cover with boiling water. The water should be barely above the height of the lentils. Cook for 5-6 minutes at a steady boil and then remove from the heat. Check to see how much water the lentils have absorbed- if necessary add a little more so that they are still moist but not swimming. At this point they should be half-done but still have a little "bite". Put the lid back on and set them to one side- the heat remaining in the pan and the water will finish cooking the lentils for you without you worrying about overcooking them.


The burger itself is a very different animal to the regular beef burger you are used to. This little creation is a bit more delicate and may not stand up to the rigors of an outdoor grill- so beware! I opted for a dry Teflon pan and suggest you try the same for your first attempts. Either that or a broiler at a medium setting.

I used a mix of 2-parts veal to 1-part pork. Any lean cut should be ok. Cut into cubes and put them into your blender. Add a couple of ice-cubes and a splash of cream. Flavor with thyme, spring onions, salt and pepper. Whiz everything together on pulse until you have a nice compact mass. The ice-cubes help the meat and the cream to bind nicely... it is something about the protein or so I'm told. Whatever. It works better if the mixture is cool and that's the bottom line. I am guessing that it is to prevent the machine heating up and the cream curdling. Add about a quarter the amount of meat in bread crumbs into the mix to give it a bit more body. You can add an egg into the mix if you feel it will help bind everything a little better, but it is not a deal breaker. The gentle cooking is what it is all about. But we will come to that in a few minutes...

First get ready to shape your patties and get cooking! 

A good tip is to dip your fingers into a glass of water before doing so, as the mixture will be a bit sticky. My mom used to do this when she made meatballs and it just makes life easier. Thank you mom!

Don't rush these or overheat them- a medium flame is good and again, I prefer to use no or very little fat in the pan. The natural juices of the meat will appear soon enough and they will be enough to keep the burger from sticking on Teflon. Don't fuss them around too much... patience will reward you with a lovely golden-brown color on the outside and a mild, tender and moist center. They will need around 6-7 minutes on each side generally speaking.

  Now to the curried lemon sauce. So easy and so delicious! Grate the zest of one lemon and squeeze the juice- add these to a couple of spoons of lemon marmalade until you have a nice consistency and season with salt and pepper. Add powdered ginger and your favorite Indian curry- the typical Madras curry works wonderfully here. There should be enough sweet and sourness going on with the juice and the jam and enough added flavor with the ginger and curry... all you need to do is to season with salt until the result tastes balanced and mild. Back to the lentils. Stir a chopped scallion into your lentils and add a drop of roasted sesame oil and a drizzle of honey. Fill into a small ramekin and turn-out onto your dish. Top with some finely sliced, seeded cucumber. The fresh, mild flavor is a nice contrast to the tangy curry sauce. 

Slice the burger and fan it out a little on your plate. It is just nicer to do it this way- the presentation is prettier and all of the flavors combine so much more nicely. Drizzle with the curry sauce and sprinkle with a little more spring onion slices. A few chili-threads are a nice finishing touch. And the thought that you would never get anything this awesome at a burger joint is a great feeling too! Enjoy!


Tuesday 24 May 2011

Salt of the Earth

Seasoned Salts with Citrus, Herb & Spice Infusions

Welcome back fellow Gastronauts!


After a wonderful escape to visit friends in Nashville, I return with a new chapter to my never-ending story of food, life, the universe... and my little part of it! 

I wanted to give a few of my friends out there a little "thank you" for their hospitality and support in my writing of this blog. After raping and pillaging the garden of my best friend Stephen (thanks a gazillion!), I created a little something for them all to remember me by... behold my "Salt of the Earth"!

This is a simple but AMAZING selection of herbs and spices and citrus flavors... but as with everything that I do- it is all in the mix! Have a glass of water at the ready (salt IS pretty salty you know!) and try out your own combinations. If you feel that way inclined- here is a how I went about making it... it is pretty easy and makes for a great all-purpose seasoning for any number of summer dishes. Are you ready? Then let's go!

I started out with 3 basic spices: coriander and fennel seeds and chili flakes. I heated them in a dry pan until
the essential oils begun to do their thing and everything smelled wonderful... be sure not to overheat and burn them as the chili will take your breath away if you do!

Now you need the zest of your favorite citrus fruits. In my case I used lemon, lime AND orange zest. I used a zester and then chopped the thin strips of zest with a knife, but you could grate the zest with a microplane if you have one. The next step is to pound the toasted spices and the zest in a mortar and pestle. You want the spices to soak up the essential oils of the zest and the rough texture to help grind them up.

This is the part when you rape, pillage and generally wreck your own, or your best friends garden. Or go to the market or local grocery! In this case it was Stephen's rosemary, sage, basil, thyme, parsely, mint and lemon verbena... and plenty of it!

I chopped the herbs roughly and then popped them into a blender along with the spices and zest and my sea salt. Before I whizzed everything together, I added the secret ingredient... sugar. That's right! The thing that brings all of these flavors to life, is the crazy sensation they give on your tongue in combination with the sweet and salty base.

Tasting is believing! Whizz everything together and have a taste. Too salty? Add more sugar. Too sweet? Add more salt. It's as easy as that. The basic ratio of salty to sweet for my taste is 2 parts salt to 1 part sugar.

As you can see from my images, the end result is a moist flavored salt, which will taste wonderful on grilled meat, fish or salads. We tried it on potatoes and they were to die for!

If you don't like the fact that the salt is moist, let it rest for a few days and the salt will draw the moisture out of the other ingredients. If you want to do something awesome- put it on an oven tray and dry it out carefully. Keep your heat relatively low- but fear not if it is a little too high. What will happen then, is that the sugar will caramelize and make the whole thing even more delicious. It may clump together a little and need whizzing again in your machine... but what a small price for heaven!