Tuesday 31 January 2012

Rise of the Flat Bread (Part Two)

Schiacciata con Cavolo, Pancetta & Patate Americane
Flat Bread with White Cabbage, Sweet Potato and Bacon


So- with no further ado, our next flat bread and a slightly more unusual topping for this one. I don't quite know why, but I almost just woke up this morning with the strange thought for this flavor combination. Somehow I knew it would work... I just didn't know how well it would work until I finally did it! So let me tell you what was involved... and relax- it was easy! Very, very easy...

I started off by cutting a small chunk off a white cabbage and slicing it as thinly as I possibly could... which was pretty thin! Despite what some of you might believe, after my accident last Christmas. In any case, I then sprinkled the cabbage with salt and sugar and let it sit for 9-10 minutes. I then squeezed a little lemon juice onto it, let it sit for a further 5-10 minutes and then squeezed it out. I then drizzled it lightly with olive oil and added a sprinkle of caraway seeds.


Next, I cut off a small chunk of sweet potato, from which I took thin shavings with a potato peeler. I sautéed these in a dry non-stick pan with a little chopped bacon, some fresh rosemary and a little crushed garlic. Once the potato began to look translucent and the bacon was cooked but not crispy, I removed them from the heat.

Back to the cabbage! I spread the cabbage out on the pizza dough evenly and then added the sweet potato and bacon. A light drizzle of olive oil and little nutmeg and pepper and the whole thing was good to go into the oven until it was golden brown and delicious.

The cabbage becomes sweet and mild and blends in wonderfully with the salty, tasty bacon bits and the mild sweet potato... a light, healthy and above all pretty and healthy treat! One to be enjoyed- and preferably in company!

Rise of the Flat Bread (Part One)

Schiacciata con Melanzane, Olive & Mozzarella
Flat Bread with Aubergine, Olives and Mozzarella


There are a number of definitions and perceptions as to what a "Schiacciata" actually is in Italy... it is a rather confusing affair! In Florence, it is a sweet dish, in Sicily, it is a folded-over bread with a filling, much like a Calzone. But basically, it is a piece of flattened out bread dough with a topping- hence the name Schiacciata, which means, more or less, "squashed". I hope you do not feel crushed with disappointment yourselves now that you know it doesn't mean something prettier... but there you go!

So, being as the details for making these little beauties is so limited, I will try to keep them brief and let the pictures do most of the talking! I used a pre-made pizza dough to make them- sure it is easy, but if you live on your own and it is a spur of the moment decision... it really doesn't make sense to go buying yeast and then making the mess and spending the time, just for a 6" square of pizza!


As you can see, I used one of those mini aubergines to make this... you may not believe it, but one is all you need per person. Cut it into thin slices and sautée them in a little olive oil, along with a couple of sprigs of thyme and and a little garlic- this will take all of 3 minutes! Add a little nutmeg, salt  and lemon juice and remove from the heat.

Spread out an even amount of mozzarella, torn into little pieces, onto the dough and then add the aubergine and a few Kalamata olives that have been plucked apart. A little more nutmeg and pepper and a hint of oil and into the oven it goes for around 15-20 minutes at a moderate heat- depending on your oven. By then it should be a lovely golden-brown in color- if not, a quick blast under the broiler will take care of that!

And that is our flat-bread number one!

Want to see number two? Then click onto the next page on this very blog! What are you waiting for?!?

Monday 30 January 2012

My-Thai Soup!

Zuppa Thailandese con Tofu, Gamberi, Funghi, Mini-Melanzane & Piselli
Thai Soup with Tofu, Shrimp, Oyster Mushroom Mini-Aubergine and Sugar-Snap Peas


The temperatures get colder, the Winter lingers on and the need for hot and satisfying food doesn't fade away... it just get's stronger! And the one thing that is always good is a hot and spicy soup to warm you through and through.

This week will quite possible end up being a little Asian by persuasion... you see, I bought the biggest bunch of cilantro on Saturday- and I intend to use it! I also bought a block of firm, organic tofu from my local Asian supermarket, as well as some spices... I just couldn't resist! And why should I?


Ok- this was a simple affair and the only real work was in preparing the spice paste for flavoring the broth... but even that was not difficult! I took about 1" each of ginger and galangal, a clove of garlic, a small chili pepper (without the seeds- unless your name happens to be Rambo), a handful of cilantro stalks, 1 shallot, a little turmeric and a pinch each of salt, pepper and sugar. That all went into my blender with a little sesame oil and lime juice and got whizzed together into a paste- easy so far, no?

Next, I shelled the shrimp and put the shells into a saucepan with the paste and turned on the heat. I toasted the shells and paste together with a little tomato paste and then deglazed the pan with some Sambuca (!) and added hot water. Hey- this is MY recipe, ok? And I'm Sicilian! I added a piece of star anise and some sliced celery and let the broth simmer for a good 20 minutes. So that is why I chose to add a splash of aniseed flavored liquor- just to up that flavor a little. And of course, the shells came out at the end of that time- they had done their part by infusing the broth with some excellent rich flaor too.

Before I turned my attention to the other ingredients, I soaked a couple of dried king-oyster mushrooms in some warm water for 10 minutes until soft. In the meantime I diced the tofu and sliced the baby aubergine- those little ones are SO cute! Oh- and tasty too!


Ok- so now it was time to add the tofu and mushrooms, which I let simmer for 10 minutes. While that was happening, I shredded a small handful of sugar snap peas lengthways and a small shallot. I added the peas, shallot and aubergine together and they took up the last 10 minutes of the cooking time. So... it wasn't that difficult after all, was it?
I seasoned with a little fish sauce, a splash of soy sauce and a drizzle of sesame oil... together with a few fresh leaves of cilantro, a few chili flakes and a last squeeze of lime... and supper was ready to be served! And the result doesn't really look all that bad... although it is nothing near as good as it tasted...

Sunday 29 January 2012

Zim-Salad-Bim!

Insalata di Couscous Arabica
Arabian Couscous Salad


Supper this evening, was a little Arabian magic-spell, to ward off any evil inches gathering too closely around my waistline. Yes, I do worry and I do struggle, when it comes to maintaining some semblance of a "figure", whilst dedicating myself so intensely to creating these recipes and updating this blog with my little creations...

So a salad it was to be! But not just an ordinary salad, I still wanted something satisfying and tasty and I wanted to have a little fun. So I grabbed my favorite Arabian spice mix, Ras al Hanout, and my mortar and pestle... and before I even had a real plan... a real plan began to form in my minds eye...


I mixed the ground spices into my couscous- it was about 1 teaspoonful to 2 cups of couscous. I then added raisins, turmeric, barberries, shredded white cabbage, shallot, finely chopped mint and cilantro, some grated ginger, a squeeze of lime juice, a sprinkle of sugar, salt and pepper, and added enough boiling water to cover it all and then about 1" more. And that was it. I gave it a good stir, covered it and let it sit for 5-10 minutes, until the couscous had absorbed all of the water, and the flavors from the spices and other ingredients had infused the now wonderfully fluffy couscous with their yumminess! I smelt fantastic!

The heat of the boiling water had "cooked" the shallot and the white cabbage just enough, that they still were crunch and had "bite" to them, but were much milder and enjoyable to eat. I added fresh cilantro leaves, a small handful of coarsely-chopped pistachios, a drizzle of sesame oil and a sprinkle of ground sumac. And that was my Supper- all done in around 10 minutes! Light enough to make any dietician smile and satisfying enough to keep those evil calories at bay! As if by magic!

Saturday 28 January 2012

Done Some Dim Sum

"Agnolotti Asiatiche" con Ripieno die Maiale al Vapore
Steamed Pork Dumplings


Sometimes, it's those little things in life that make all the difference, am I right? And sometimes, those little things are parcels of dough with a ground pork and shredded cabbage filling... and yes they did make a difference this evening! They put a smile on my face and that's for sure!

I had been out of town all day and was home and hungry... it was after 8pm and something had to happen FAST! I opened the freezer and there was a packet of Thai Spring-roll pastry... next to it was a container of shredded red cabbage that I had frozen a month or so ago, in the fridge was ground pork, ginger and some fresh white cabbage- and already a thought was forming...

Before I knew what was happening, I had fetched out my trusty steamer, started some water boiling and was reaching for my chopping board and the fun was about to begin!


I finely shredded the white cabbage and mixed it with the ground pork- about a handful of each. To this I added about a teaspoonful of grated fresh ginger, the same amount of finely chopped coriander, some salt, pepper, 5-spice powder, a little fish-sauce and a pinch of sugar... and that was the filling taken care of!

Next, I cut rounds from the spring roll pastry using a cookie cutter. Using a double layer of pastry, I laid out the ground pork mix and one side of the circle and folded it shut. I glued it down using a simple paste made of flour and water, first with one layer of pastry and then with a second, just to make sure the little parcels would not be too delicate.

To steam the dumplings, I laid out lettuce leaves  on the steam rack to prevent the pastry from sticking.The type of lettuce I used was similar to a Romaine, but you can use any kind that you like. I sprinkled the red cabbage with a little salt and sugar before adding it and then put on the lid and steamed everything for 10 minutes... and that was it!

I served them with a little Thai sweet chili sauce and some toasted red-chili flakes on the bed of lettuce I steamed them on and a little of the red cabbage. A few Spring onion rings and a little fresh Cilantro and a good time was had by all! Well... by me anyway...

Friday 27 January 2012

Getting Warmer...

Straccetti di Manzo a Brodo con Orzo Perlato
Strips of Braised Beef with Pearl Barley & Vegetables


Yes indeed... getting warmer is what it's all about when the real cold of the Winter weather finally does come around. Like this evening! I got home frozen through and needing something hot, tasty and good- it was Friday night, the working week was behind me and I figured I deserved it!

Being as I had some other chores to do before being able to settle down to supper, I decided to sacrifice the slice of braising steak I had planned on turning into a Bolognese at some point this weekend and make something else. I cut it into thin strips, or "Straccetti" and put it on to a slow boil until it was tender and at the same time, I had a nice tasty broth to use for this great bowl of Winter wonderment!


Ok- so the meat simmered for about 45 minutes, after which time I began cooking the rest. I started off with some chopped carrot, celery and finely chopped celery stalks, which I sautéed in a little olive oil with some crushed garlic. Yes, I did say that I used the stalks there- I always do! Do you throw them away? What a shame! There is much more flavor in the stalks than in the leaves when it comes to cooking! That is why I always prefer to cook with the stalks and add the leaves at the end.

After around 2-3 minutes, add the barley to the vegetables and add the meat from the other saucepan, whilst retain the broth at a low simmer. Season with a little marjoram, chili, salt, pepper and nutmeg. Now proceed to add the broth, little be little and to keep on stirring, as you would when making a risotto. After 10-15 minutes the barley should be almost ready and this is the time to add the last ingredients, which are a handful of chopped green beans, a couple of sun-dried tomatoes cut into strips and yes- now you can add the other handful of finely chopped parsley!

After a further 5 minutes of cooking, everything should be mild, fresh, tasty and ready to serve! I added a little fresh, creamy ricotta and some finely chopped Kalamata olives, along with a few fresh leaves of parsley... and dinner was served! Warming and simple and delicious- just the thing to keep the cold at bay! Enjoy!

Wednesday 25 January 2012

Thai Me Up!

Curry Veloce Thailandes "Penang" di Maiale & Verdure Miste
Quick, Low-Fat Thai Penang Curried Pork and Vegetables


I love Thai food, how aromatic it is, complex in flavor and yet simple at the same time- it really is one of my favorites! But much as I adore those rich, dreamy, coconut-milk based curries or the fried noodle dishes, I sometimes like to try to keep meals lighter and lower-fat. For me, it is the wonderful flavor combinations that make Thai so exciting- so I decided to keep the taste and cut the calories- and came up with this dish of my own!


Of course this is not authentic or traditional Thai cuisine, but the typical flavors are there and the for a home-made meal, using fresh ingredients, that is all that we are worried about, right, readers?


I used one of those store-bought Thai curry pastes- I think the Penang variety tastes best to pork and so I blended that with a little fish sauce, a little sweet chili sauce, some lime juice and some honey. I put these ingredients into a small saucepan with a little water and let them reduce together.

In a separate saucepan, I chopped some potatoes into bite-sized chunks and began par-boiling them. Whilst this was happening, I started frying the pork, also cut into bite-sized chunks, in a little sesame oil. Once it began to brown, I added red peppers and green beans, along with some powdered galangal and lime leaves. After 2-3 minutes I added the curry paste/sauce reduction and continued cooking at a reduced temperature for
 a further 4-5 minutes- enough time for the meat and potatoes to soak up the flavor, but still retain their bite. Finish by adding an additional light drizzle of sesame oil, a chopped Spring onion and a squeeze of lime as well as a good handful of peanuts, for a savory bit of crunch!

Enjoy on a bed of rice or noodles- or just so! But do enjoy!


Gone in a Puff!

Sfogliatini Vegeteriano con Patate al Curry
Vegetarian Curried Potato Puff-Pastries


And now, by popular request, (well- by request from a certain young lady who wrote to me from Marmara University this morning :-) ), the recipe I didn't intend on posting, because of the poor photographs. Sigh. I don't know what happened... I changed the settings, altered my lighting, supposedly making things better... and then this. Oh well! As with everything else, even with photography, it is all a matter of taste- only in this case, it was the taste of the food that was better than the images!

Enough whining, the truth of the matter is that yet again, this is a little idea I had to use up the left-over mashed potato from the other night. I also thought of my vegetarian friends at the office... and left out the bacon that I was SO tempted to include in the ingredients!


I simply added to the potato (about 3 cupfuls), some low-fat cream cheese, finely chopped parsley and mint, finely chopped Spring onion, turmeric, curry powder, caraway seed and nutmeg and a couple of eggs. Easy. I stirred them together well with a fork (a whisk would simply clog up) and then seasoned with a little salt, pepper and cayenne. I added a little butter, just to make sure that everything stayed nice and juicy and sliced a little zucchini and red pepper to make a decorative topping.

Next step was to cut out out circles of puff pastry and to spread the potato mix on top, leaving around 1" of pastry uncovered around the outside edge. Decorate with a little more chopped onion, the peppers and zucchini, a few caraway seeds more and bake until golden brown in a pre-heated oven (around 15 minutes). Delicious hot or cold, these little alternatives to the classic Indian samosas make great little party treats! Try them and see for yourself!

Monday 23 January 2012

Little Pigs and Sour Grapes

Filetto di Maiale in Agrodolce
Sweat and Sour Fillet of Pork- "Sicilian" Style!

Just in case thou thought that "sweet and sour" was a Chines invention, deep fried with a pineapple and tomato ketchup sauce (yum!), you had better think again! Because I am sure that the tradition of combining sweet and savory, or even sour ingredients, is just as ancient and definitely equally as tasty here in Sicily. This is a dish that is loosely based on a pork dish that my mother makes- so Thank You Mom for the inspiration!

I used 2 slices of fillet of pork for this dish, but the flavors and the method will work perfectly well with any other cut, e.g. tenderloin. The other ingredients were apple, carrots, celery, onion and raisins... and it was all done and ready to go within 20 minutes!


I started off by slicing the carrots and celery in diagonals. I finely chopped a good handful of fresh parsley and  sliced a Spring onion, crushed a clove of garlic and was ready to go! I put the pork into a hot non-stick pan and fried it briefly from either side, just long enough for some juices and fat to start showing. I then added the celery and carrots and all of the herbs and spices, which were, a couple of cloves, a couple of bay leaves, some grated ginger, a good sprinkle of cinnamon, a star-anis, a little cayenne, some dried oregano and a little chopped parsley. This all went in, as well as the raisins. These were particularly large and succulent ones that I brought home from Sicily with me in January.

I then added the apple slices and a little butter. As soon as the apples start to brown, deglaze the pan, preferably with a splash of Calvados, but alternatively with white wine or cider. Now add the juice of 1 lemon and a good splash of wine vinegar. Cover and allow to steam for 6-7 minutes and then add a little fresh and finely chopped parsley, a light dusting of nutmeg, and a squeeze of honey... yummy!

Serve with hot mashed potatoes and drizzle with the good juices... and buon appetito!

Sunday 22 January 2012

Steak Bites!

Fettina di Manzo Rollata, Insalata Verde & Salmoriglio
Entrecôte of Beef Rolls with Salad and Salmoriglio Dressing


The most common meat "secondo" in Sicily in the Summer, after you have just enjoyed a first course of pasta, is a "fettina", or a thin slice of beef entrecote which is usually flash-fried for maybe 1 minute on either side and then served up with a "Salmoriglio" dressing made from the meat juices, garlic, vinegar and oregano. And a delicious treat it is too- there is almost nothing better in the world than a piece of bread dipped in a still-warm Salmoriglio...


So this evening, I thought- why save the best for last  all the time and why not START an evening meal with a little bite-sized serving?  Or present it as a party-snack? Well, using only 1 slice of entrecote, (although any thinly-sliced inexpensive cut will do), I managed to make 12 of these little meaty pinwheels. And I know you can only see 9 in the photos... and that is because I ate the other 3 whilst I was making them!


I took a slice of beef and spread it with the left-over liver paté from yesterday evening. I then spread it with a chunky French mustard and laid out a few full leaves of basil onto it and then rolled it up tightly. Basically- that is all there is to it! I then cut slices of around 1" thickness from the roll and skewered them with a toothpick... and you can't get much easier than that! They were then flash-fried in a very hot griddle pan for just 1 minute on either side- just long enough to char the surface.

The "Salmoriglio" was then quickly made, by dropping a little thinly sliced garlic onto the pan and by deglazing it using a small splash of water and then following it swiftly with some freshly squeezed lemon juice, vinegar, olive oil, salt, pepper, honey, oregano and parsley. The amount of each of these ingredients is a question of taste and it all depends on how many steak-bites you are making and how much sauce you want... trial and error my friends! But try it indeed- because you are going to love it!


I served mine on a bed of fresh green lettuce greens which were shredded and lightly salted, then came the meat skewers, and over the top came the warm, tangy and delicious dressing! A perfect combination! Try it and see!


Saturday 21 January 2012

Roman Treasures

Mafaldine al Paté di Fegato d' Anatra
Mafaldine with Duck Liver Paté


That's a strange heading, you are thinking, whilst reading about something as decidedly French as a  duck liver paté, which is the the main ingredient in this dish. Well, that is because the second most important flavor-giving ingredient is Vecchia Romagna Brandy- which translates into English as "Old Roman", but it was a nice addition and a great new flavor to add to this simple recipe!

I would love to tell you that the pasta was hand-made, but I would much rather tell you the truth! I didn't get home until late this evening, was tired, hungry- and looking to make something swift and tasty. As usual! And this was the result of maybe 10-12 minutes of cooking... still looks pretty presentable, don't you think?


Start off by boiling you pasta as according to the instructions- they usually take 8-9 minutes. Whilst that is happening, chop a very fine dice of Spring onion, garlic, carrots, parsley (including stalks) and celery. Prepare your liquor of choice- I used, as I said, Vecchia Romagna, but you can use any kind of brandy or whisky in this dish. Once the pasta is done, drain it, but not too thoroughly and start getting things put together. Leaving a little water in when you drain the pasta will help make the finished result much better.

In a hot non-stick frying pan, stir-fry around 1 generous tablespoon of a coarsely ground liver paté per person, which you will find, soon begins to dissolve in the frying pan. As soon as this happens, add the finely chopped vegetables and allow to fry together for a few minutes.

After 2-3 minutes, deglaze with a good shot of brandy, add add the drained pasta and stir until it is nicely coated and succulent. You can add a little olive oil if you so wish, but I found it to be just fine without any added fat. I added a sprinkle of toasted chili flakes for some extra zing and a garnish of parsley and enjoyed it immemsely... and I can imagine you will too if you give it a try!

Friday 20 January 2012

Mix 'n' Match!

Saporiti Verdure e Lenticchie Miste con Couscous
Tasty Mixed Vegetables and Lentils with Couscous 


I realized this morning that I had some leftovers (again) of assorted beans and lentils- not quite enough of each to make a full meal or a decent side... but just enough to bother me! There were mung beans as well as green and yellow lentils. So I decided to mix them together and leave them to soak until I got back home from work in the evening- I thought for sure I would have had an idea of what to do with them by then!

And then suddenly, my workday was done and I was back home and in the kitchen.... starving! And worse still- I still didn't have any idea of what I was going to do with the lentils! This left me only one reasonable option and it is what I usually do in such a situation- I just START cooking and let my imagination and hunger work out something for me... and so far I have never had to go hungry!

I put the lentils onto a slow simmer, with a bay leaf and prepared the other ingredients: a fine dice of bacon, onion, celery and carrot, the remaining half of a king oyster mushroom and some crushed garlic. These went, as is usually the case when I am cooking, into a dry non-stick pan and began to brown gently.


Whilst they were taking care of themselves I prepared some couscous with finely chopped parsley, salt, pepper, a little mint and a little lemon juice. I simply mixed the ingredients together, poured enough boiling water over to cover nicely and let it fluff-up whist I got back to the lentils... and everything started coming together nicely!

It was time to start pulling things together and the next ingredients were some finely diced red pepper and the fine green beans, which I added to the lentils for the last  3-4 minutes of cooking time. I then transferred the lentils to the vegetables in the frying pan and added some fresh thyme, finely chopped parsley and mint, some cayenne pepper, ground cumin, a little balsamic vinegar and a drizzle of honey... and suddenly everything was bursting with flavor! I have found in the past, that adding the herbs and spices earlier diminishes the nice fresh flavor and for me at least- this is the way to go when it comes to lentils!

And there you have it! With a simple garnish of thinly sliced pepper and a light trickle of sesame oil, Friday's supper was rescued! And it was so delicious that it may well be repeated sometime!


Magic Mushroom Tortilla

Tortilla Croccante con Formaggio Cremoso, Funghi, Pancetta e Pepe
Crispy Cream Cheese Tortilla with Mushrooms, Bacon and Peppers


It was like this you see- supper was bubbling away, but I was just feeling ravenous! I needed a drink, I needed a snack and I needed it fast! Pouring a gin and tonic was easy enough, but I needed something crispy to nibble on and had no chips or crackers. But I DID still have a couple of tortillas at home...

Suddenly I had an idea! I had a few leftovers from my supper ingredients and I had maybe half an hour to wait until supper was ready. So I got to work on turning them into a more than luxurious little before-dinner treat- but then hey! I deserve it after all this cooking I do!


I sliced some bacon into very fine strips and started it frying in a dry non-stick pan. When it was half-done, I removed it from the frying pan and replaced it with some very thin slices of king oyster mushroom and a little crushed garlic- this also fried for only 2-3 minutes on either side until cooked and soft. I then removed the mushrooms from the heat and set them to one side.

I then took a soft cream cheese-curd and added parsley, chives and thyme to it, added a squeeze of lemon juice, some salt and pepper and spread the mix onto the tortilla. I then layed the mushrooms out, followed by the bacon and then, again followed by some finely sliced red peppers and spring onion. I seasoned with salt, pepper, nutmeg and a little Tobasco- amd into the oven it went for 5-6 minutes under the broiler, by which time it was the rich, toasty gold color you can see in the photos and ultra-crispy and delicious!

So easy! So where was my drink again...?

Thursday 19 January 2012

How to Slay the Dragon

Pollo Mediterrano, Saltato con Dragoncello, Pepe, Sedano e Funghi
Mediterranean Stir-Fried Chicken with Tarragon, Peppers and Celery and Mushroom


You are seeing these pictures and thinking of soy-sauce, ginger and chili... am I right? Ah, but then you would be disappointed my friends if you tried this dish- or maybe not! Because although it is fried in a pan and although I had a little fun with the chop sticks when I took the photos, the flavors are very European... but still very tasty! And not wanting to wok the boat too much, I will tell you what you are looking at here and how to make it!

The name of this post is derived from the Italian "dragoncello" which is the word for tarragon... don't you love that? Makes me smile ever time! As you may have noticed, I already made a couple of dishes with tarragon this week, so this evening I decided to make use of the remainder of the bunch before it began to wilt... as ever with me it was a case of waste not- want not! The "dragon" had to go!

 
So, it was indeed a very simple affair. In a little olive oil, I fried the chicken breast and the mushroom, along with some finely chopped garlic, for 2-3 minutes. The mushroom I used was a king oyster mushroom- one of my favorites- and one is enough per serving. Next I added the celery slices and seasoned with salt, pepper, a little mustard powder, a hint of cinnamon and a squeeze of lemon. I continued frying for 2-3 minutes, in which time I finely sliced a shallot and a half of a pointed red pepper.

I added these last 2 ingredients along with the tarragon- a whole handful- the flavor is very mild, especially after cooking. I fried for a further 2-3 minutes and deglazed the pan with a splash of Sambuca and then grated it with a little fresh nutmeg and added about a tablespoon of honey. And that was my light, Mediterranean stir-fry for tonight. I enjoyed mine with a little toasted ciabatta and a glass of white Corvo. Life can be so simple and so good...

Wednesday 18 January 2012

Fool for Fazool!

Fusilli con Cime di Rapa, Fagioli, Pepe & Pomodoro
Fusilli with Turnip Greens, Beans, Peppers and Tomato


I remember as a child growing up in England, hearing Dean Martin singing "That's Amore" and finding the line about "pasta fazool" absolutely hilarious... what WAS that anyway?!?! How was I to know that is was the American way of saying "pasta e fagioli", or pasta and beans? We used to have pasta and been soup as well, but it was very different to the dish that ol' Dean Martin was singing about and of course you always want to have what you haven't got and the grass does always seem greener from the other side...

So now, a few years later (no I am NOT going to admit to it being more like 35 years later!), I decided to try something a little different to the kind of pasta and bean soup my mother used to make in Sicily and to see what all that singin' was about anyway...


My mom used to make a soup with a broth made from the greens, which were usually broccoli or cabbage and with either kidney, Cannelini beans- (or both!), maybe a potato or two... and that was it. Very basic, rustic and honest and much better than it may sound. But my dish this evening was a little more complex, a little bit more fun, but equally easy and definitely a whole lot quicker- especially as I used beans from a can!

First, prepare a "sofritto" of finely diced carrot, celery and onion and sautée it with some finely diced smokey bacon until it begins to brown. In the meantime, cut the turnip greens into small pieces and add them into the mix. Next, deglaze the saucepan with a little white wine and and add your pasta of choice and enough boiling water to cover it. Add salt, pepper, thyme and a little Tabasco and let it simmer for 7-8 minutes, stirring occasionally. After this time, the pasta is almost done and it will have soaked up a lot of the broth. Add a good tablespoon of tomato paste, the beans and about a cupful of finely diced red peppers.
Before you know it, the juices will have thickened up to more than a broth but less of a soup- a kind-of in-between thing that is really, really nice in the Winter!

Serve with a light drizzle of olive oil, a fresh splash of Tabasco, a little fresh thyme and some grated, salted ricotta cheese! And does that sound good- or does that sound good! Buon apetito!

Tuesday 17 January 2012

Juiced a Minute...

Pollo al Arancia & Dragoncello, con Spinaci & Puré
Tarragon & Orange Chicken with Spinach and Mashed Potato


I have to admit, I am definitely more of a leg than a breast man- at least when it comes to chicken that is! Thigh meat is always tastier and juicier, as is all meat that is still on the bone, whereas the more delicate breast meat has a tendency to dry up if you are not careful. So I decided to try out a new approach to cooking a whole breast of chicken and to see if I could manage to get a nice result. Judging by the pictures... how do you think I did?

This may seem a strange method for cooking a chicken breast, but again, I wanted to experiment and try out something new! I started off by heating a small amount of water in my non-stick pan until it began to boil and added the chicken. I let it continue boiling until the water had evaporated away, flipped it over and added another splash. I seasoned it with salt and pepper and at this point I added a little oil. I didn't start the meat off by frying it in oil, as I wanted it to absorb the water and to steam and effectively "pre-cook" before I began to fry it. I now added a few slices of orange to the pan and some crushed garlic. Before slicing the orange, I used my zester to scrape off most of the zest as I needed this for the sauce and the garnish. I poured boiling water over the zest and added a teaspoon of sugar and let it sit- this would remove any bitterness and to make the texture more pleasant for eating.

Back to the chicken! I kept the heat relatively high at this point, as I wanted the juice of the orange to begin caramelizing a little and sticking to the bottom of the pan along with the meat juices. And then I added a good shot of Cointreau and whole lot of flavor in the form of crushed garlic, a little finely chopped fresh chili, some whole tarragon leaves a hint of cinnamon, a leaf of bay and a little bit more water. The water will start to boil and draw the juices out of the orange slices and it is at this point that we want to turn the heat down to a simmer and cover the pan to let the meat steam and take in all of those flavors.


Whilst the chicken is cooking gently, we can start to boil out potatoes for the mash and to sautée the spinach with a little garlic in olive oil. After 1-3 minutes of sautéeing the spinach, I did that same thing and added a small amount of water and turned up the heat... I seasoned with salt, pepper and nutmeg and continued cooking until the water had evaporated away- by which time the spinach was done.

I turned my attentions back to the chicken and added a little honey to the pan and a little
little mustard powder as well as a little of the zest. I added a little more water, replace the lid, and after a further 5-10 minutes, the meat was almost done. I now added a little sesame oil, some fresh tarragon and the remaining zest of the orange. Once these had soaked up the juices, I spooned them over the breast and then put it onto a tray and placed it under the broiler for a few minutes.

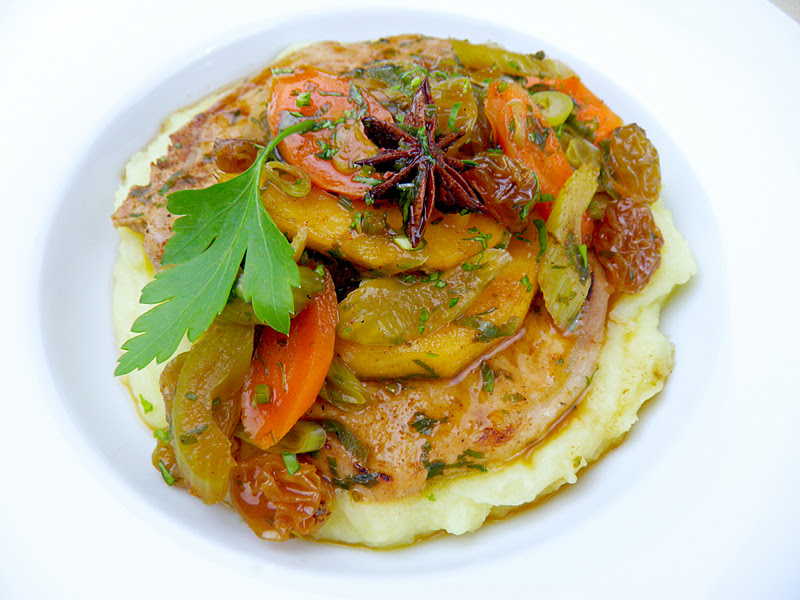
Working swiftly, I quickly mashed the potatoes with a little warm milk, butter, nutmeg, salt and pepper as usual. I set this into a serving ring and laid the spinach on top, pressed it down into shape and voila!- my little side dish was done. In the meantime, the breast was golden and the juices in the pan had reduced down to a nice, thick, sweet and tangy sauce.

My little garnish of crispy parmesan set off the spinach and potatoes nicely and dinner was served! I have to say that I found the meat to be very flavorful and juicy cooked this way. The continuous adding of small amounts of liquid let the meat constantly absorb the moisture and flavors in the pan. It definitely is a nice alternative to frying, which is not as bland as boiling or steaming and which ensures that plenty of flavor gets taken up by the meat during cooking. And all you have to do at the end of it all... is as always... to enjoy!